DIY Compost Bin: Easy Builds for Beginners
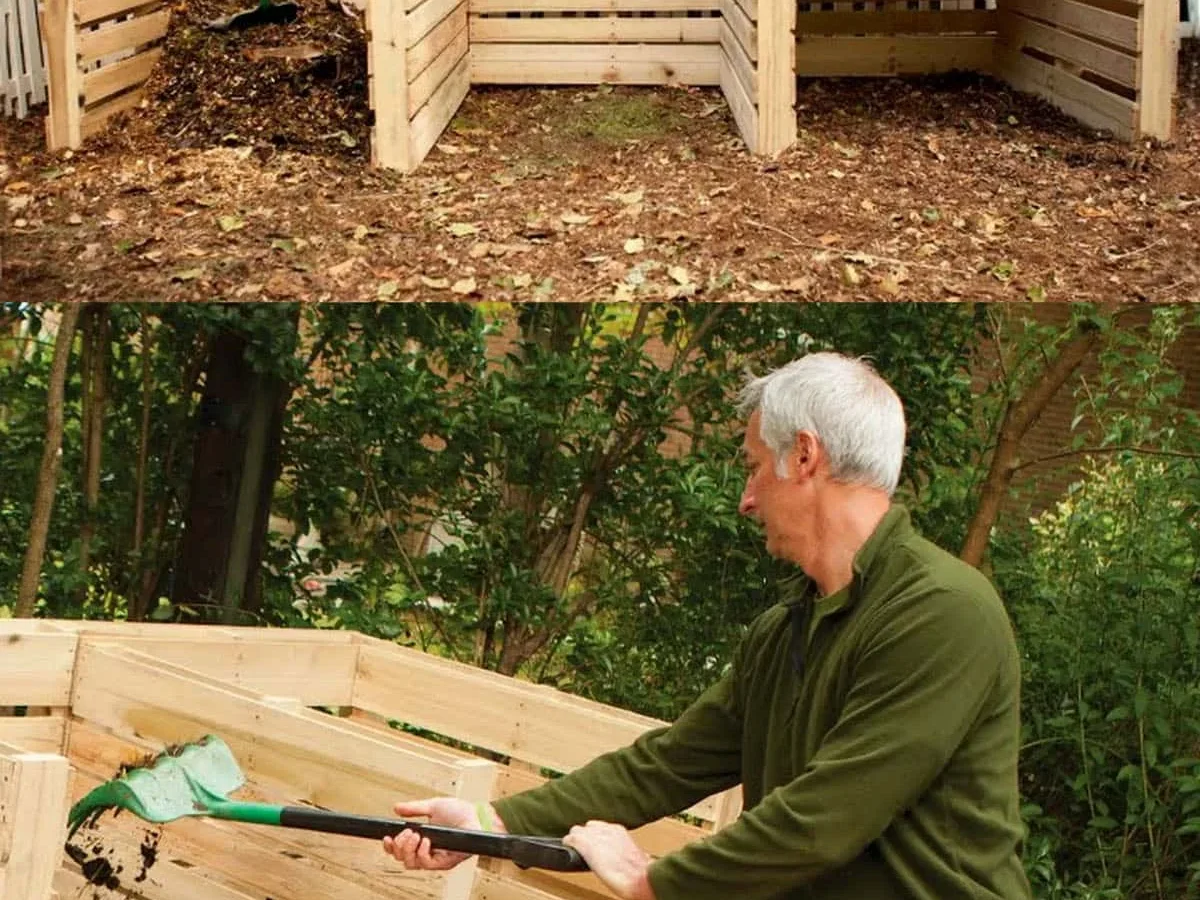
You’ve got a yard, a pile of kitchen scraps, and a growing guilt about sending it all to the landfill. A compost bin diy project is the obvious fix, but the internet throws a hundred different plans at you, and honestly, they all blur together. Do you need a tumbler, a wooden box, or just a hole in the ground?
Here’s the reality: the best bin is the one you’ll actually use. Our research shows that most successful composters start simple and adapt as they learn. As of 2026, the cheapest effective DIY builds run between $10 and $40 using repurposed materials, versus the $100-plus you’d drop on a commercial unit.
Let’s cut through the noise and figure out what works for your space and your patience.
Quick Answer
A DIY compost bin is any container you build to hold organic waste while it breaks down. You can build one from wood pallets, wire mesh, or a plastic tote in under three hours. The design matters less than airflow, moisture, and access.
Start with a simple three-sided pallet bin for $15 or less.
Why the Right Bin Design Matters Before You Cut a Single Board
Here’s the thing nobody tells you about DIY composting. The build is the easy part. The design decisions you make beforehand are what determine whether you get rich, crumbly soil in six months or a stinking, slimy mess that attracts every raccoon in the neighborhood.
Think about what your bin actually needs to do. It needs to hold materials, let air reach them, keep moisture in, and keep pests out. That’s it.
But each of those four functions fights against the others, and the way you balance them depends entirely on your situation.
Your yard size matters. Your climate matters. What you’re putting in the bin matters.
And how much effort you’re willing to put in matters most of all.
Before you buy a single screw, work through this quick checklist:
- Size: A bin smaller than 3x3x3 feet won’t generate enough heat to break down quickly. Bigger isn’t always better, though, if you can’t fill it.
- Location: You want level ground, some sun, and proximity to a water source. You also want it within reasonable walking distance of your kitchen door, because convenience is what makes or breaks a composting habit.
- Access: Think about how you’ll turn the pile. If you can’t reach the material easily, you’ll stop turning it, and then you’ll have a cold, slow pile.
- Pest pressure: Urban areas bring raccoons, rats, and possums. Rural areas bring those plus bears. Your bin’s lid and base need to match your local wildlife situation.
A face-to-face diagram of these four considerations is worth a thousand words of explanation. The good news is, once you’ve answered these questions, picking a design becomes almost automatic. You don’t need a custom blueprint.
You just need a concept that fits.
Your DIY Compost Bin Options: What Each Design Looks Like and Who It’s Best For
Let’s walk through the main players. Each of these designs has a visual signature, a different build complexity, and a different user profile. Match yourself to one and you’ll save a lot of wasted effort.
The Pallet Bin: Classic, Cheap, and Forgiving
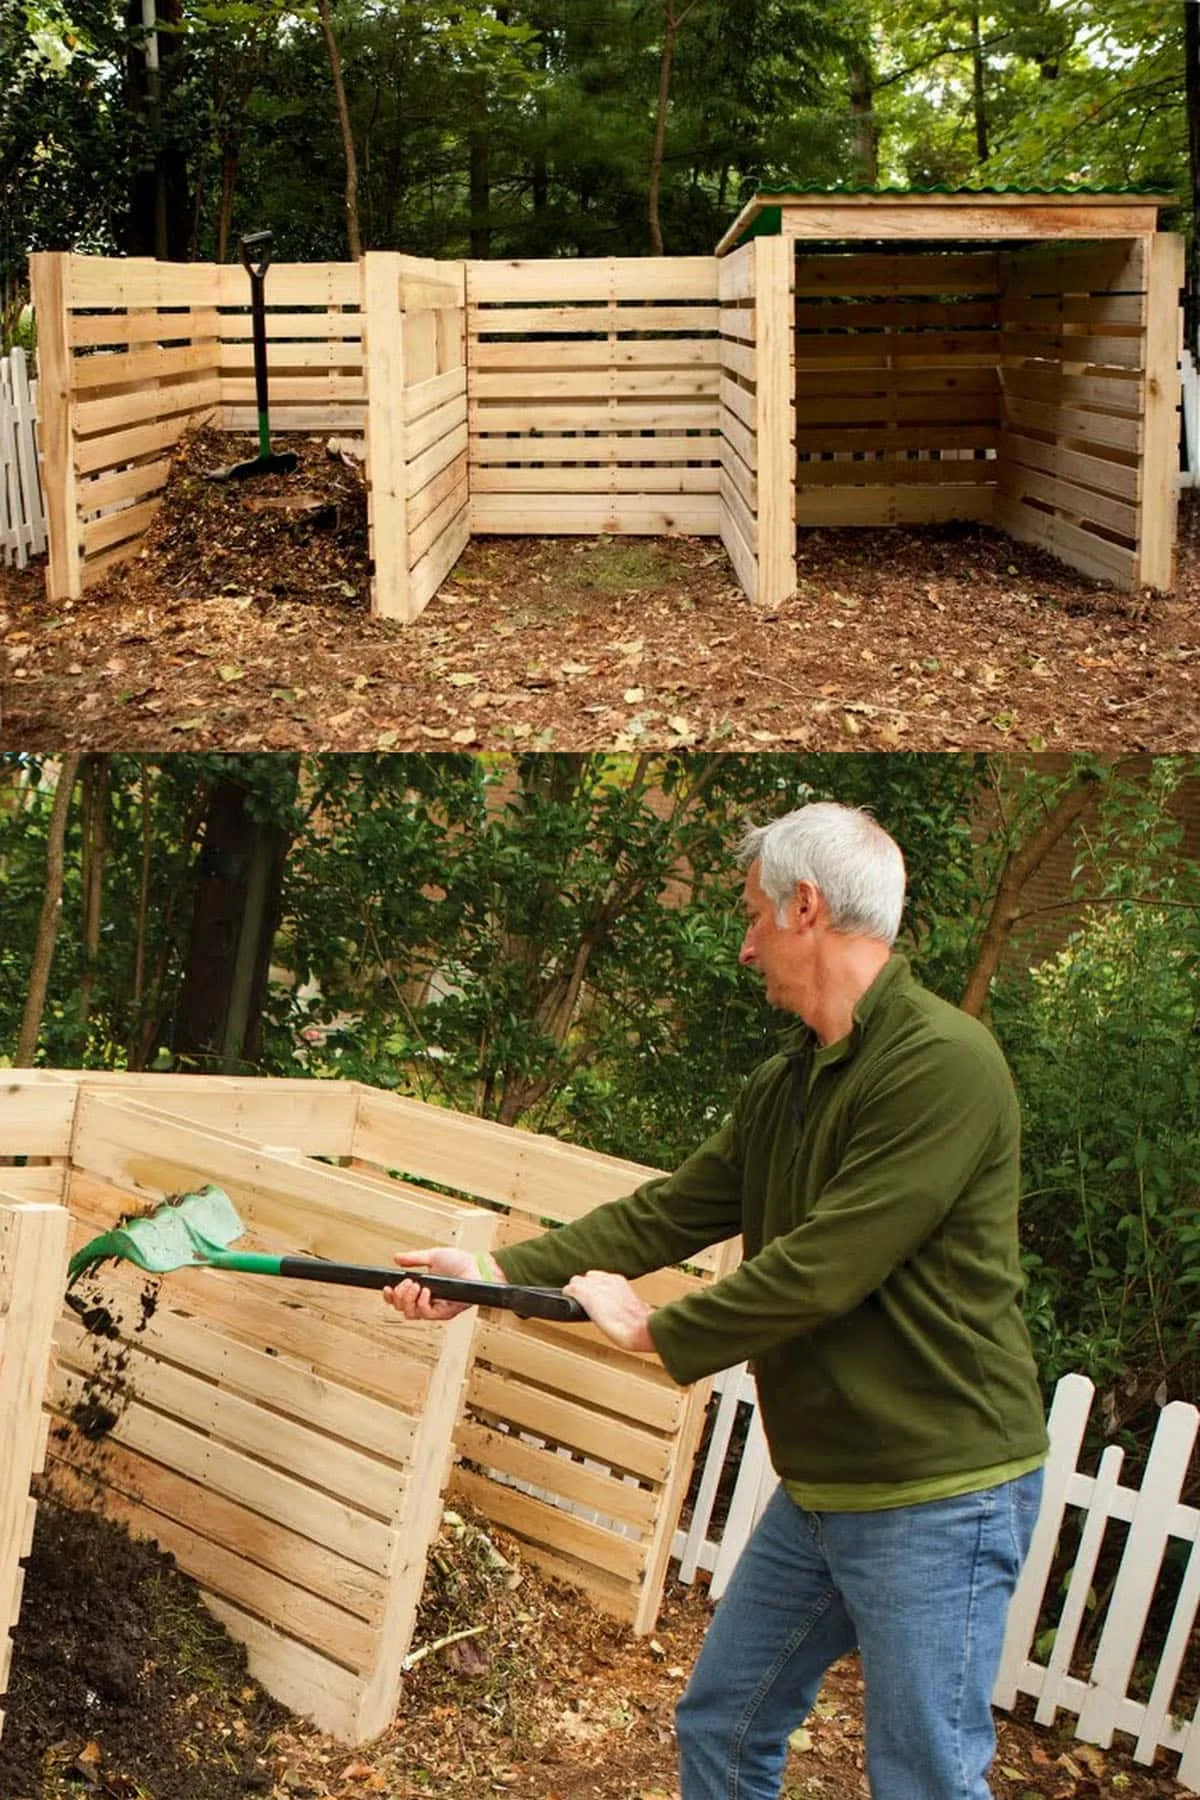
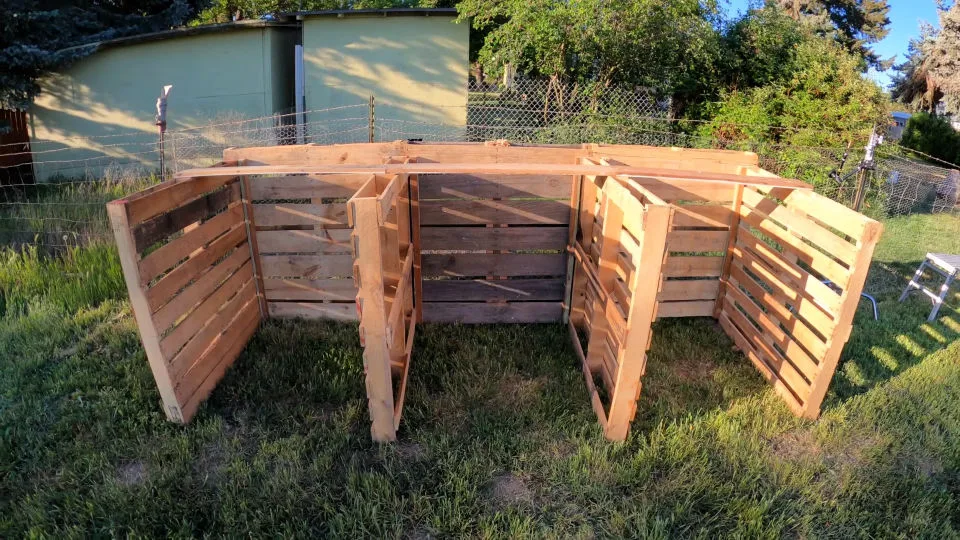
This is the granddaddy of DIY compost bins. You’re looking at four wooden pallets arranged in a square, sometimes with a fifth as a floor or a front gate.
The visual is unmistakable: a rustic, slatted box with visible gaps between the boards. Those gaps are actually your best friend. They let air flow naturally from every side, which means you barely have to think about aeration.
Pallet bins excel when you have a decent amount of yard waste and a steady stream of kitchen scraps. They’re also fantastic if you want to build something that looks like it belongs in a garden rather than a plastic box.
The tradeoff is that they take up space. You need a full 3×3-foot footprint minimum, and that’s just for a one-bin setup. Where this design really shines is in a three-bin rotation system, but we’ll get to that.
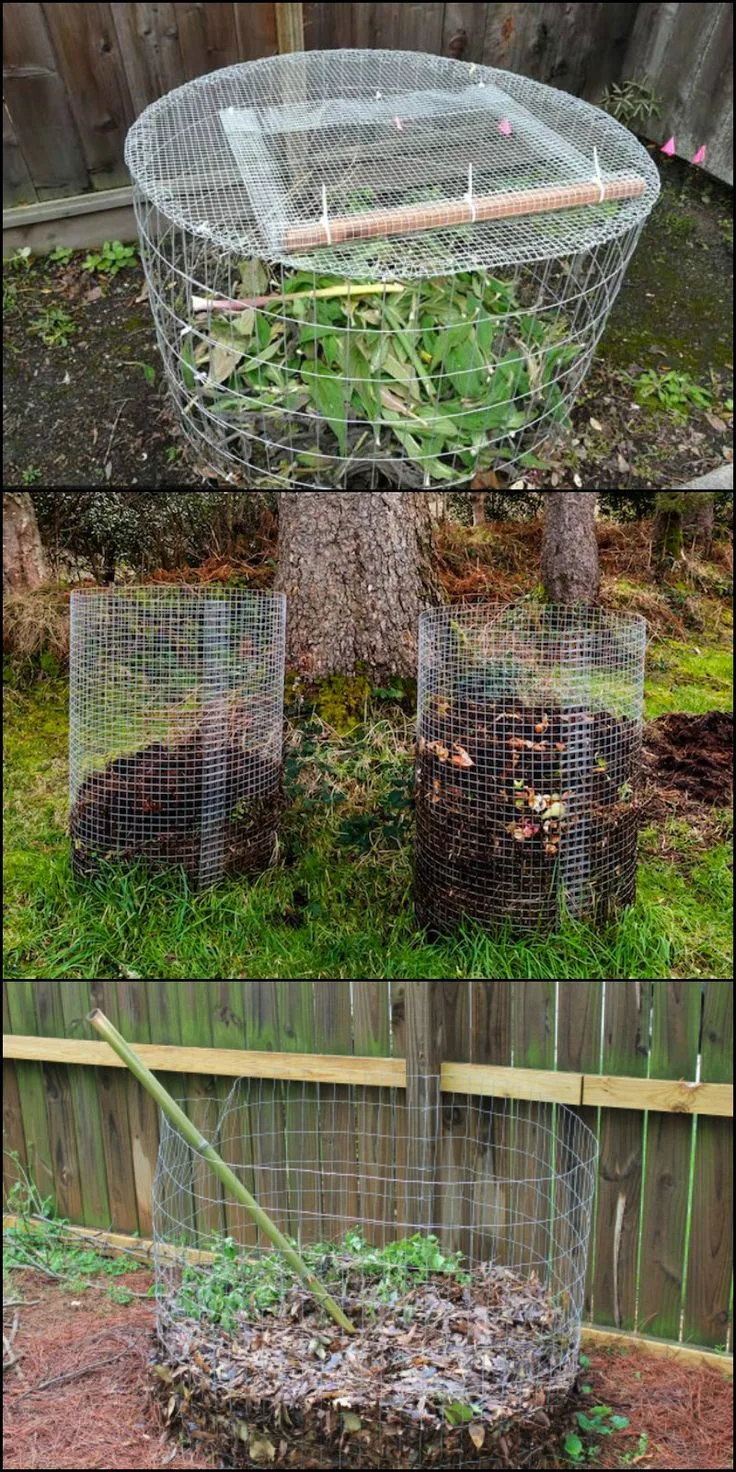
The Wire Mesh Cylinder: Simplest Build, Best Airflow
If you want the fastest possible build, this is it. A roll of hardware cloth, a pair of tin snips, and some zip ties. Ten minutes, done.
Visually, it’s a wire cylinder standing on end, open at the top and bottom. The mesh is typically half-inch hardware cloth, which keeps rodents out while letting air circulate from every angle.
This design is perfect for gardeners who want to process leaves and grass clippings in bulk. It’s also a great option for beginners who aren’t sure they’ll stick with composting. If you abandon it, you can just roll up the wire and stash it.
The downside is that it’s not the prettiest thing, and it doesn’t retain heat as well as a solid-sided bin. You’ll also find it harder to turn, since you’re reaching over the top rather than through a front hatch.
The Trash Can Tumbler: Easy Turning, Contained, and Portable
Picture an old metal or plastic trash can, laid on its side, with a crank or handle you can rotate. That’s the DIY tumbler.
Some builders mount the can on a stand with an axle through the center. Others just set it on the ground and roll it around manually. The key visual element is the lid that seals tight, plus aeration holes drilled around the body.
Tumblers are ideal for small yards and for people who don’t want to bend over. Since you’re rotating the whole vessel, you’re also mixing the compost without any extra tool. It’s the most “set and forget” of the DIY options.
The main drawback is capacity. Trash cans hold far less than a pallet bin, and the sealed environment can get too wet if you’re not careful about moisture. You also need to let it rest for a few weeks before harvest, because finished compost and fresh scraps don’t mix well.
The Plastic Tote Bin: Apartment-Friendly and Beginner-Proof
Two stacking storage totes, one with a drilled lid, is the classic balcony composter. It’s small, cheap, and entirely contained.
Visually, it looks like exactly what it is: a plastic storage bin with ventilation holes drilled in the lid and sides. The bottom tote collects liquid that drains from the top, which you can use as compost tea.
This is the design for apartment dwellers and anyone with a tiny patio. It’s also great for people nervous about smell, since the lid seals everything in. Just remember that a small bin means a cold pile, which means it’ll take a year or more before you see finished compost.
The Three-Bin System: For Serious Gardeners and Heavy Volume
This is the gold standard for people who generate serious yard waste. You’re looking at three adjacent pallet bins, each holding material at a different stage of decomposition.
Bin one holds fresh scraps. Bin two holds material that’s halfway done. Bin three holds finished compost that’s ready to use.
You turn by forking material from bin one into bin two, then bin two into bin three.
It’s a commitment to build, but it streamlines your workflow significantly. If you have a big garden, you’ll produce more compost than you can use, and you’ll never run out of space for new scraps.
Pin this design for the future if you’re a beginner. It’s not a starting point; it’s a goal.
Step-by-Step Visual Build Guide: The Pallet Bin (The Best All-Around Beginner Build)
Let’s get into the nuts and bolts. If you’ve weighed your options and landed on the pallet bin, here’s what the build actually looks like. This is the design with the most visual detail, so pay attention to how the boards interlock.
Gathering Materials: What to Look For in Pallets
Not all pallets are created equal. Look for the “HT” stamp, which stands for heat-treated. That means the wood was heated to kill pests, rather than fumigated with methyl bromide.
Fumigated pallets might carry a “MB” stamp, and you want to avoid those. You don’t want those chemicals leaching into your soil.
You’ll also want pallets that are structurally sound. Check for cracked boards, missing slats, or signs of dry rot. A pallet with a split corner will just disintegrate in a year.
One more thing: avoid painted pallets. The paint can contain lead or other heavy metals that you don’t want in your garden beds.
Site Prep: Level Ground, Sun Exposure, and Drainage
Your bin is only as good as its foundation. You want a spot that’s relatively level, because a leaning bin gets unstable over time.
Clear the area of grass and weeds. You can lay down a sheet of landscape fabric or a layer of cardboard to suppress growth. Some people leave the soil bare, which is fine and actually helpful, because it lets earthworms and beneficial bacteria travel into your pile from below.
Partial sun is ideal. Full shade dries out the pile. Full sun dries it out even faster, especially in summer.
Assembling the Frame: How the Corners Lock Together
Stand your four pallets up to form a square. The stringers, those thick vertical boards on the back of each pallet, should face the inside of the bin.
The simplest way to join the corners is with zip ties or heavy-duty wire. Thread them through the gaps between boards and pull them tight. It’s not elegant, but it works incredibly well.
You can also screw the pallets together using deck screws, but that requires a drill and a bit more effort. Zip ties are fine for your first build and easy to release when you want to dismantle.
Securing the Sides: Reinforcement Points That Matter
The corners are the weak points, so that’s where you focus your reinforcement. Use two zip ties per corner, one near the top and one near the bottom. That stops the bin from splaying outward, which happens when you pile material inside.
If you want extra stability, you can hammer wooden stakes into the ground at the corners and zip-tie the pallets to the stakes. This keeps the bin from shifting during storms or when you’re turning the pile.
Building the Front Slats: Removable vs. Hinged Access
You don’t want a closed box. You need a way to reach the material at the bottom of the pile, where the finished compost collects.
Some builders simply leave one side open. That’s the easiest approach, but it creates a visual mess and lets pests wander in.
A better option is making a front gate. You can attach individual boards to the front using hooks and eyes, held in place but easy to remove. Or you can hang a single wide board on hinges to swing it open like a door.
Removable slats let you access the bottom without disturbing the top. That’s ideal, because the freshest stuff is on top and the finished stuff is on the bottom. You can fork out what you need from underneath and leave the rest intact.
Optional Lid and Base Upgrades for Pest Control
If you have pest pressure, you’ll want to upgrade before you even finish building. A lid isn’t strictly necessary, but it deters animals and keeps excess rain out.
For a bin lid, you can lay a spare pallet on top. It’s heavy enough to stay put but light enough to lift. If you want something more refined, attach a piece of corrugated roofing or a plywood sheet on hinges.
For the base, consider laying down a piece of half-inch hardware cloth. It blocks rodents from digging in from below while still letting worms and beneficial bugs pass through. It’s a simple addition that saves you a lot of heartache.
Airflow, Moisture, and Layering: Getting the Science Right Without Overthinking It
You’ve built the physical structure. Now you need to understand what happens inside it. This is where most DIY composters stumble, not because it’s hard, but because they overthink it.
The Visual Balance: How to “Read” Your Pile’s Health
Good compost looks a lot like a freshly baked cake. It’s dark, crumbly, and smells vaguely like earth. If your pile resembles a wet, sloppy salad, you’ve got too much moisture.
If it looks like a dry pile of branches, it’s too dry.
Your eyes and nose tell you everything. A healthy pile holds its shape when you squeeze a handful but releases a drop or two of moisture. It should smell earthy, not sour.
When things go wrong, it’s usually obvious. A sour, ammonia smell means too many greens and not enough airflow. A dry, dusty look means you’re not adding enough water.
Browns and Greens: The Simple Ratio That Prevents Smelly Piles
You’ve probably heard of “browns” and “greens.” Brown materials are carbon-rich, like dry leaves, straw, and cardboard. Green materials are nitrogen-rich, like food scraps, grass clippings, and coffee grounds.
The ideal ratio is roughly 25 to 30 parts carbon to 1 part nitrogen. But nobody measures this precisely. The simpler heuristic is two to three parts browns for every one part greens by volume.
Why does this matter? Because too many greens without enough browns causes ammonia and rotting smells. The greens break down fast and release nitrogen, and without carbon to absorb it, the pile goes anaerobic.
Where to Place Your Aeration Holes (and Where Not To)
The gaps in your pallet bin are already doing most of the aeration work. But when you start turning the pile, you’re introducing more oxygen, which speeds things up.
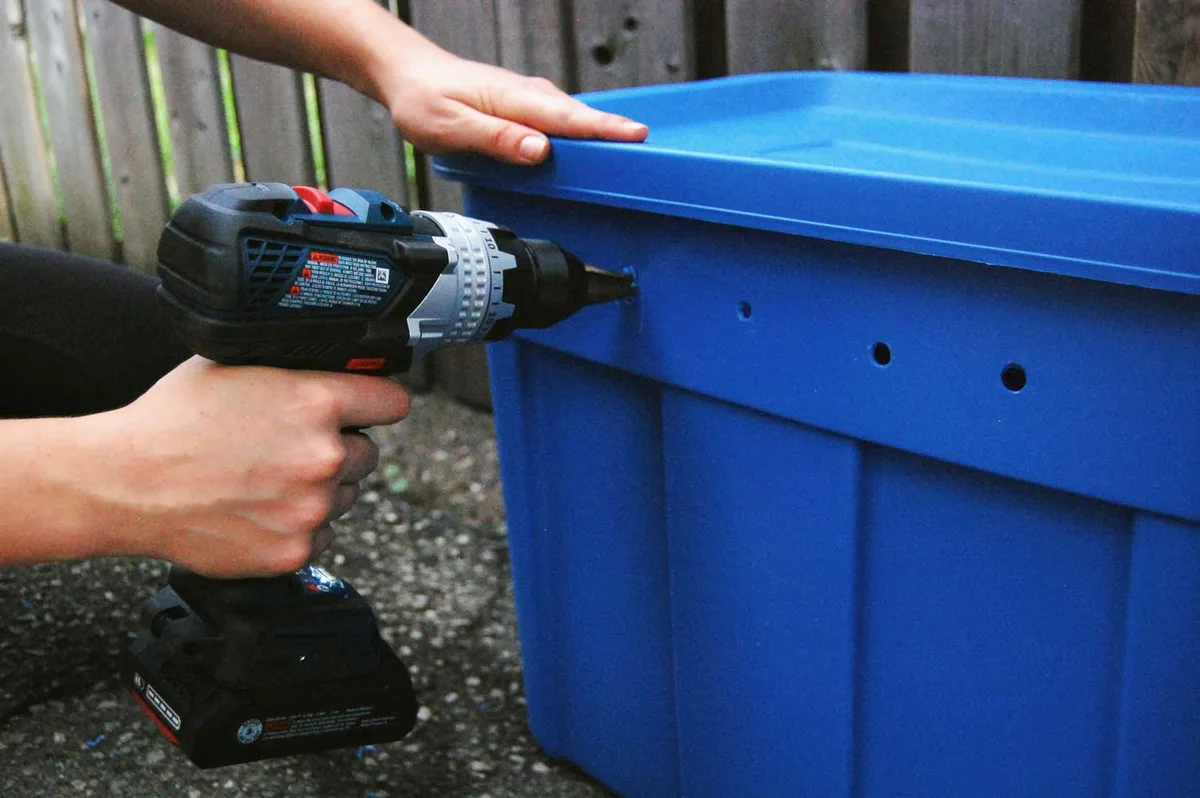
If you’re using a plastic tote or trash can design, where you place your holes matters. Drill holes in the lid and around the sides, starting about four inches from the bottom. Avoid drilling into the bottom itself, because that just lets liquid leak everywhere rather than draining into a collection tray.
Space your holes about four to six inches apart, and use a half-inch drill bit if you have one. That size allows broad airflow without letting the contents fall out. You can see in a simple diagram that holes scattered evenly, high and low, create a natural chimney effect that draws air up through the pile.
How to Tell If Your Pile Is Too Wet, Too Dry, or Just Right
Here’s the simplest test. Grab a handful of material from the middle of the pile and squeeze it. If water drips out, it’s too wet.
If it crumbles and falls apart, it’s too dry. If it clings together and feels like a damp sponge, you’re perfect.
When your pile is too wet, add brown material. Dry leaves, shredded cardboard, and straw soak up excess moisture. When it’s too dry, give it a good soak with a hose and turn it.
One more trick: cover the top of the pile with a layer of dry leaves or a tarp. This keeps rain from drenching your pile and prevents moisture from evaporating too fast in summer heat. It’s a small step that makes a big difference, especially if your climate swings between wet and dry seasons.
Mistakes I See Most Often (And How to Fix Them Fast)
We’ve covered the right way. Let’s talk about the wrong way, because that’s what you’ll actually run into. These are the most common DIY bin failures, born out from countless forum threads and garden club meetings.
Using the Wrong Pallets (Chemical Treatments and Rot)
This is the biggest mistake. People grab the first pallet they find, not realizing it’s been treated with methyl bromide or soaked in a chemical spill.
That “HT” stamp is your friend. It means the wood was heat-treated. If you see “MB,” put it back.
Also, avoid painted or stained wood, as we touched on earlier.
Worse than chemicals is rot. A pallet that’s already soft and crumbling will fall apart in under a year. It might look fine on the outside, but if it’s been sitting in a damp warehouse for years, it’s compromised.
Skipping the Bottom Barrier (Rodents Will Thank You)
Your bin looks great when you build it. Then, a month later, you find a rat nest in the bottom. That’s what happens when you skip the base layer.
A half-inch hardware cloth barrier on the bottom floor is non-negotiable in urban and suburban areas. Rats can squeeze through gaps you’d never think possible. The mesh blocks them without stopping the earthworms that do so much of the heavy lifting.
To install it, just lay the mesh flat on the ground beneath your bin, extending a few inches past the edges. You can staple it to the bottom of your pallets or simply weigh it down with bricks.
Building Too Small (Size Matters More Than You Think)
A bin that’s two feet square might seem adequate, but it won’t heat up. The minimum efficient size for hot composting is a 3x3x3-foot cube.
If your bin is too small, the pile won’t generate enough internal heat to kill weed seeds and pathogens. You’ll get a cold, slow decomposition process that takes a year or more. You’ll also find yourself constantly filling it up and running out of room.
When in doubt, build bigger. It’s easier to scale down than to rebuild.
Ignoring Access for Turning (Your Back Will Hurt Later)
The bin look amazing closed up. Then you realize you’re lifting a heavy lid and leaning over the top to lift material with a pitchfork. That gets old fast.
A removable front or a hinged door is not a luxury. It’s a necessity. When the pile compacts and sinks, the easiest material to remove is on the bottom.
Without a door, you’ll either hurt your back or stop turning entirely.
Build access in from day one. Future you will be grateful.
Sealing Everything Shut (Anaerobic Rot Is a Nightmare)
One more mistake: people treat their bin like a sealed container. They think covering it completely will keep pests out and heat in. Instead, it creates an anaerobic environment.
No oxygen means the aerobic bacteria die off, replaced by anaerobic bacteria that produce methane and hydrogen sulfide. The results are foul and truly unpleasant, and the pile turns toxic to plants when finished.
Trapped moisture doesn’t help either. In a sealed bin, condensation builds up and the pile turns into sludge. Keep the lid on to deter pests, but drill holes or leave gaps for airflow.
It’s a balancing act.

Similar Posts